Introduction
Hey everyone, welcome back! Today, we're diving into an exciting DIY project: building your very own digital weight scale using Arduino. Whether you're a beginner or an enthusiast, this guide is packed with everything you need to get started. We’ll walk you through the entire process, from circuit design to testing the final product. Let’s jump in!
Materials Required
Before we dive into the construction, let’s gather all the components and tools you’ll need for this project:
- Arduino Nano
- 16x2 LCD display
- 10kg load cell
- HX711 load cell amplifier
- Push switch
- 10k variable resistor
- MDF board
- Ethernet cables (for wiring)
- Soldering iron and solder
- Wire cutters and strippers
- Sandpaper
- Glue gun
- Bolts and screws
Step 1: Circuit Design
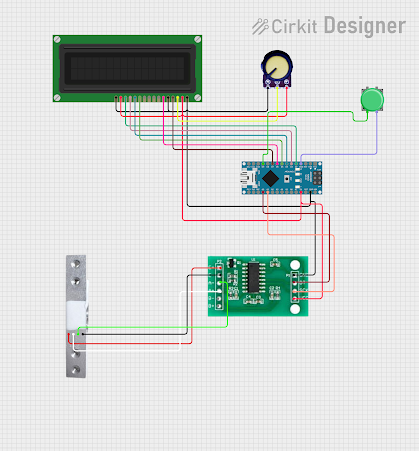
The first step in our project is designing the circuit. Proper circuit design is crucial for the functionality of your weight scale. For this project, we’ll use Cirkit Designer software to simplify the process. The software allows us to visualize the connections and ensure that everything is in order before we start soldering.
Circuit Diagram:-
Soldering the Components
With our circuit design ready, it’s time to move on to soldering the components. Soldering is a delicate process, so take your time and ensure all connections are solid. Follow the circuit diagram closely, and double-check each connection before moving on.
Writing and Uploading the Arduino Code
Now that our circuit is assembled, it’s time to program the Arduino. We’ll be using the Arduino IDE for this task. The code for this project is already prepared, and you can download it from the description. Once you’ve written or downloaded the code, connect your Arduino Nano to your computer and upload the code.
## code link
Preparing the MDF Board
With the technical parts nearly complete, we need to prepare the base for our scale. We’ll be using an MDF board for this. Cut the board to the required shape, and then use sand paper to smooth the edges and surface. This will give our scale a professional finish.
Assembling the Scale
Now that all the components are ready, it’s time to assemble the scale. Glue down the circuit and tighten the bolts on the load cell. Make sure everything is securely attached and that there are no loose connections.
Powering Up and Calibration
We’re almost done! Connect the power source to the Arduino and power up your scale. Before using it, we need to **calibrate** the scale. Press the push switch, and the display will prompt you to place a 100g weight on the scale. This step ensures that your scale is accurate and ready to use.
Testing the Scale
With the calibration complete, it’s time to test your scale. Place a weight on the scale and check the reading on the display. If you calibrated it correctly, the scale should show an accurate measurement. Test it with different weights to ensure consistency.
Conclusion
And there you have it! We’ve successfully built a digital weight scale using Arduino. This project is a fantastic way to learn more about electronics and programming while creating something practical. Whether you’re a beginner or an experienced maker, this project is a great addition to your DIY portfolio.
FAQs
1. How accurate is the digital weight scale?
The accuracy of the scale depends on the calibration process and the precision of the components used. With proper calibration, it can be very accurate.
2. Can I use a different load cell for the project?
Yes, you can use a different load cell, but make sure it’s compatible with the HX711 amplifier and can handle the weight range you need.
3. What other projects can I build with Arduino?
Arduino is incredibly versatile. You can build everything from smart home devices to robotic systems. The possibilities are endless!
4. How do I troubleshoot common issues?
If your scale isn’t working properly, check the soldering connections, ensure the code is uploaded correctly, and make sure all components are securely attached.


.png)
.png)
.png)
.png)
.png)